In this article, we'll be detailing the installation of LTI Advantage in Schoology
First, let's talk about installing the LTI, you've got options! 👀
- You can install the app from the Schoology App Center and follow these directions while getting it installed
- Or, you can have your Schoology System Administrator Install the Interplay Learning App for you.
If you are installing the app from the Schoology App Center, please navigate to this article
In this article, we'll be focusing on installing LTI Advantage with your Schoology System Administrator
Below is what installing this app looks like from the app center.
During this "Install/Remove" step, you'll be given a window like below, which will ask you to select courses. You'll want to select "All Courses" here.
Share Your Schoology Deployment ID information with us
- After you have finished installing the app. Go back to your App Center and click on “Configure”. Copy your unique Deployment ID. You’ll need to send this to our support team in order to complete your configuration.
- Email the following information to support@interplaylearning.com :
- Subject Line: “Schoology LTIA Deployment ID”
- Body: Please include your company name, your contact info, and your Deployment ID
- We will be in touch with you to set a date for deployment and will confirm once the LTI Advantage integration is live.
For more information about installing the Interplay Learning app, please reach out to your Account Manager or support@interplaylearning.com
Now that we've installed the LTI, let's add content!
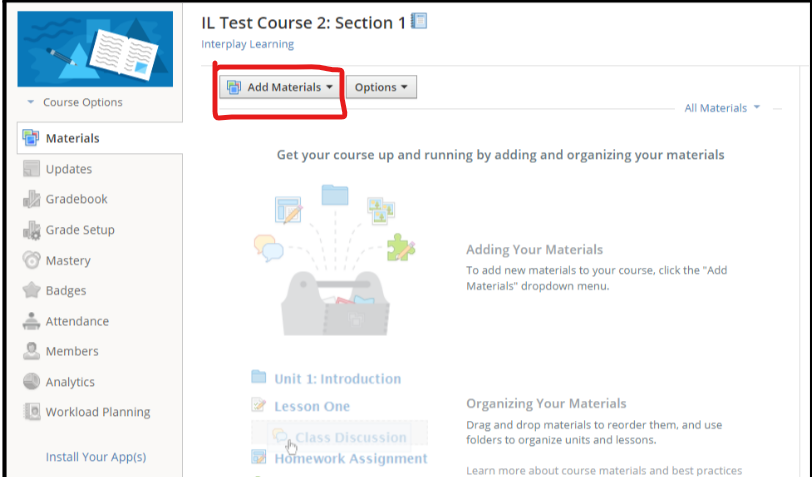
1. In the Materials area, select Add Materials.

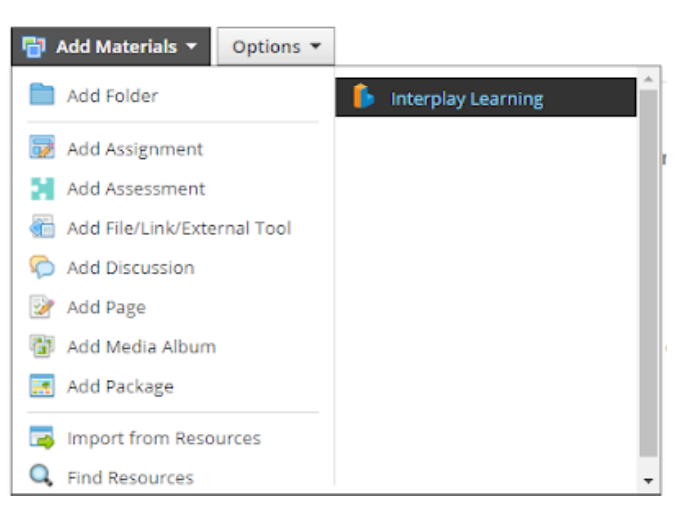
2. Select Interplay Learning
If you do not see Interplay Learning, reach out to your Schoology Admin to ensure the application has been installed for your course.

This will open up the Interplay Learning catalog where you can select the subject you are interested in.
You can search or filter the courses from this view.
Enter your search or filter criteria and select “Apply”. You can also clear all filters by selecting “Clear”.
To return to the main catalog selection screen at any time, use the “breadcrumbs” area at the top and select “Catalog”
Select a course from the list. It will open up additional information about the course including the course description and expected duration of the full course (including all lessons).
From here, you can select to include a link to the full course or just to an individual chapter.
Select the link under “Course Link” to include a link to the full course. Select a link under “Chapter Links” to include a link to a single individual chapter.
Once you have selected your course or chapter, it will be added to your Schoology course. If you wish to edit the title, you can.
Below is what your module should look like after you've selected your course or chapter.
During this process, please keep in mind: Do not click "Enable Grading"
It is very important that you do NOT select the “enable grading” option for Interplay Learning links. This will create duplicate Gradebook entries.
Instead, you should click on the link once as the instructor, this will create the gradebook column.
If you forget, the column will still be created the first time a student clicks on the content link, but you will no longer be able to edit the grading settings.
GRADING SETTINGS
Please follow the steps below to enable your grading setup.
Do not click "Enable grading" when connecting your courses.
- In “Grade Setup” the “Weight Categories” option should be selected and a default category should be set.
- The Interplay Learning content links will be added to the default category.
Additionally, if you select the default category itself, the "Calculated by" option should be set to "Total pts."


